SQLAlchemy queries: The minimum you need to know
Posted on Sun 02 July 2023 in Databases
In my previous post, I showed show you how to use simple SQL queries to read data from a database and load it into Pandas dataframes. As you learn more about data science, you will need to learn more about the SQL language. However, if you wish to work mostly in the Python language, you may instead invest your time learning to use the SQLAlchemy library.
SQLAlchemy
SQLAlchemy provides a standard interface that allows developers to create database-agnostic code that communicates with a wide variety of database engines 1. It is an Object Relational Mapper (ORM) framework that translates Python classes to relational database tables, and automatically converts Python function calls to SQL statements.
SQLAlchemy can seem like it has a large learning curve, but you only need to learn a little bit about it to get started, especially if you plan to use Pandas with SQLAlchemy. This post describes how to use SQLAlchemy to gather information about an existing database's schema and to build SQL queries that you can use with the Pandas read_sql_query() function.
Why use SQLAlchemy to generate query statements?
The SQL language is relatively simple to use for the kinds of database table queries that you will create while you are learning data science technologies. So, why would a Python programmer want to use the SQLAlchemy ORM instead of just embedding actual SQL statements in their programs? The main reasons are:
- It abstracts away the SQL language and focus on writing "Pythonic" code that interfaces with the database
- The same code supports multiple SQL language variations
- Automatic SQL statement optimization
- Declarative mapping of database tables to Python classes enables you to document the database schema in your Python program
Python programmers may prefer to use SQLAlchemy to create query statements because it allows them to use Python code to express database queries and avoids embedding strings that contain SQL queries in Python programs.
Different SQL servers support variations of the SQL language. Python programmers may invest their time learning SQLAlchemy instead of multiple SQL language dialects.
When working with large and complex databases, users must ensure their SQL statements are optimized. Un-optimized queries produce the same data as optimized queries but may use up significantly more resources. The SQLAlchemy ORM will output query statements using industry-standard optimizations.
While we do not cover it in this post, programmers may use Declarative Mapping to manually build SQLAlchemy ORM classes. The code you write becomes documentation of the database and its relationships, which helps other program maintainers.
Prerequisite knowledge
Before you get started using SQLAlchemy, you need to know a little bit about each of the following topics:
- The basics of Python. If you do not already have some basic Python skills, I suggest you read my post, Python: the Minimum You Need to Know, or a similar tutorial.
- The basics of relational databases. You need to understand the principles upon which relational databases like SQL databases are based.
- The basics of working with data in Pandas. I covered this in my previous post, Python, pandas, and databases
Basic setup
The examples in this document were created on a PC running Ubuntu Linux 22.04. You may follow the same procedures using Windows or Mac OS, with minor changes.
Database
You must have access to a database. Either you followed the instructions in my previous post about setting up a sample database on Azure SQL Server and got the connection string from your Azure database server, or you already have a valid connection string to an existing database.
In this post, you will use a sqlservercentral.com public SQL Server database that serves an instance of the AdventureWorks LT sample database.
Install drivers and other software
I have already covered the process for installing the correct drivers on Ubuntu Linux and creating a Python virtual environment in my previous posts. I also showed you how to install the Microsoft SQL Server driver on your PC in a previous post. So, I will just list all the required commands here, without explanation.
$ sudo su
$ curl https://packages.microsoft.com/keys/microsoft.asc | apt-key add -
$ curl https://packages.microsoft.com/config/ubuntu/$(lsb_release -rs)/prod.list > /etc/apt/sources.list.d/mssql-release.list
$ exit
$ sudo apt-get update
$ sudo ACCEPT_EULA=Y apt-get install -y msodbcsql18
$
$ mkdir data-science
$ cd data-science
$ python -m venv .venv
$ source ./.venv/bin/activate
(.venv) $ pip install jupyterlab
(.venv) $ pip install python-dotenv
(.venv) $ pip install pyodbc
(.venv) $ sudo apt install unixodbc
(.venv) $ pip install pandas
(.venv) $ pip install openpyxl xlsxwriter xlrd
Install SQLAlchemy
Install SQLAlchemy:
(.venv) $ pip install sqlalchemy
Start a notebook
This post uses a Jupyter notebook as an advanced REPL that makes it easier to demonstrate the Python code used to access data from a database and display the results. Start a new Jupyter Notebook.
(.venv) $ jupyter-lab
When following along with the code examples in this document, open a new notebook cell for each example, enter the code, and run it. The results of code run in previous cells is held in memory and is available to subsequent cells. For example, a dataframe created in one cell can be used in a later cell.
If you prefer to use a simple text editor or the Python REPL, you can still follow along with this tutorial.
Database documentation
You need information about the database schema, specifically the relationships between tables. Read the database documentation. If no documentation is available, you may analyze the database with a SQL discovery tool like SchemaSpy, SchemaCrawler, SQLite Browser, or DBeaver Community Edition. Another way is to use the SQLAlchemy inspection module to gather information and use it to draw your own diagram. I will describe how to use the inspection module in a future post.
For now, use the database diagram as your documentation. The AdventureWorks LT database diagram is shown below 2:
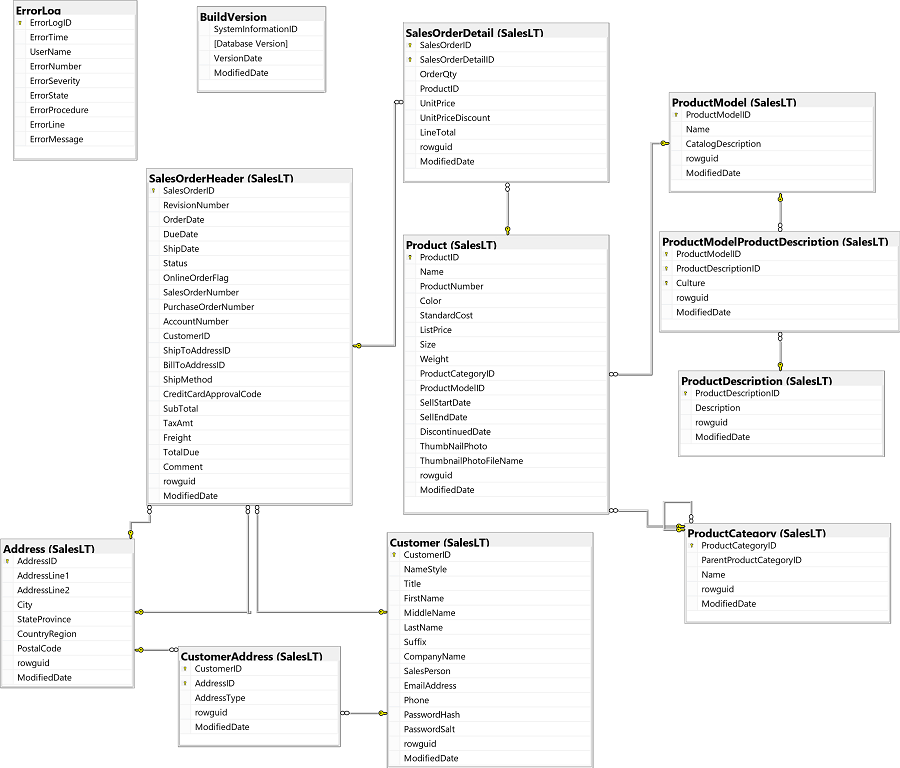
The diagram shows the database tables, the columns in each table, each table's primary key, and the foreign keys that create relationships between tables.
Create a database connection
To connect to the database, first define an environment variables that contain the database authentication information. In this case, use the database and user information provided on the sqlservercentral.com web site, which is:
- Server: sqlservercentralpublic.database.windows.net
- Database: AdventureWorks
- User: sqlfamily
- Password: sqlf@m1ly
It's good practice to store your authentication information separately from the program code in a file that is not tracked by source control. In this example, you will create a dotenv file name .env.
In your terminal window, run the following command to create the dotenv file the contains the correct database authentication information:
(.venv) $ echo DB_SERVER=sqlservercentralpublic.database.windows.net > .env
(.venv) $ echo DB_NAME=AdventureWorks >> .env
(.venv) $ echo DB_USER=sqlfamily >> .env
(.venv) $ echo DB_PASSWD=sqlf@m1ly >> .env
In your Python program, convert the database information into a database URL that tells SQLAlchemy which database driver to use, the location of the database, and how to authenticate access to it. In this example, the URL will contain an internet address and access credentials.
Enter the following Python code into a Jupyter notebook cell or text editor, and run it. This code uses the sqlalchemy.engine.URL class's create() method to build a database URL. In addition to the database authentication information you got from the database administrator, the URL also specifies the driver names you will use and the server's TCP port number. Also, because you are using Microsoft SQL Server, you need to add an additional query parameter the contains the name of the SQL Server driver installed on your PC.
import os
from dotenv import load_dotenv
from sqlalchemy.engine import URL

load_dotenv('.env', override=True)

url_object = URL.create(
    drivername='mssql+pyodbc',
    username=os.getenv('DB_USER'),
    password=os.getenv('DB_PASSWD'),
    host=os.getenv('DB_SERVER'),
    port='1433',
    database=os.getenv('DB_NAME'),
    query=dict(driver='ODBC Driver 18 for SQL Server')
)
Next, import the create_engine() function from SQLAlchemy and use it to create an engine object using the URL object you created.
from sqlalchemy import create_engine

engine = create_engine(url_object)
The engine object manages a pool of database connections. You will pass the engine object to the Pandas read_sql_query() function when you want to select data from the database and load it into Pandas.
Build a SQLAlchemy ORM model
The SQLAlchemy ORM defines database tables as classes. The process of automatically building new classes based on an existing database's schema is called reflection. If you start with a properly designed database, you can reflect table classes and data relationships with the SQLAlchemy Automap extension. Database reflection is useful when writing simple, single-use scripts like the ones in this document.
NOTE: Instead of using reflection, The SQLAlchemy documentation recommends you use Declarative Mapping to manually build SQLAlchemy ORM classes as Python classes. We ignore that recommendation in this post because it goes beyond the minimum you need to know.
If you do not know the schema of an existing database, and if you want to use declarative mapping, you may use the sqlacodegen tool to read the structure of an existing database and generate Python code describing SQLAlchemy declarative mapping classes.
We leave Declarative Mapping to your future studies.
Automap the ORM
To automatically map tables and data relationships from the public AdventureWorks LT database to SQLAlchemy ORM classes, run the following code. If the database has many tables, this code may take a while to return a result. Note that you already need to know the name of the database schema you will reflect, which is SalesLT in this example.
from sqlalchemy.ext.automap import automap_base

Base = automap_base()
Base.prepare(autoload_with=engine, schema='SalesLT')
You used SQLAlchemy's automap_base function to create a declarative base class instance named Base and then used its prepare method to automatically map, or reflect, the database schema metadata as a collection of classes.
Assign table classes to variables
The automap_base function returns mapped classes in the Base.classes collection and also stores table information in the Base.metadata 3 collection. You should already know the table names from reading the database diagram, but if you want to list them for your own convenience, run the following code:
print(Base.classes.keys())
Running the code outputs a list containing all the table names, as shown below:
['Address', 'Customer', 'CustomerAddress', 'Product', 'ProductCategory', 'ProductModel', 'ProductDescription', 'ProductModelProductDescription', 'SalesOrderDetail', 'SalesOrderHeader']
So that you can more easily use the reflected tables, assign each SQLAlchemy ORM class to a variable. Run the following code:
Address = Base.classes.Address
Customer = Base.classes.Customer
CustomerAddress = Base.classes.CustomerAddress
Product = Base.classes.Product
ProductCategory = Base.classes.ProductCategory
ProductDescription = Base.classes.ProductDescription
ProductModel = Base.classes.ProductModel
ProductModelProductDescription = Base.classes.ProductModelProductDescription
SalesOrderDetail = Base.classes.SalesOrderDetail
SalesOrderHeader = Base.classes.SalesOrderHeader
Now you've created variable names that represent each table mapped in the ORM.
Remember, you got this far because you already had a database diagram or documentation. You need to know the schema names in the database and you should also know the table names, column names, primary keys, and foreign key relationships in the database. Using reflection by itself to read data will be less effective if you do not have this information, either from documentation or by discovering it yourself using the SQLAlchemy inspection module or the Base object's metadata.
Generate SQL queries
SQLAlchemy provides functions that support interacting with a database in many ways. We are only interested in reading data from the database, so we will focus on using SQLAlchemy to create SQL queries using the SQLAlchemy Select class. The remainder of this post will cover simple uses of the SQLAlchemy Select class, and its methods.
NOTE: Use the SQLAlchemy guides, Using Select Statements and ORM Querying Guide, as references when you need to look up additional methods to build the SQL queries you need.
For example, the following code builds a SQLAlchemy Select instance that will, when used in an appropriate function like the Pandas read_sql_query() function, select all rows in the AdventureWorks LT database's ProductDescription table.
from sqlalchemy import select

statement = (select(ProductDescription))
The SQLAlchemy select() function returns a configured instance of the Select class. You can view the returned SQLAlchemy Select instance as a readable SQL statement by printing it or by converting it to a string. Either of those operations cause the instance to return a string containing the SQL Query. For example, run the following code:
print(statement)
The output is a SQL statement that selects data in all columns of the ProductDescription table:
SELECT "SalesLT"."ProductDescription"."ProductDescriptionID", "SalesLT"."ProductDescription"."Description", "SalesLT"."ProductDescription".rowguid, "SalesLT"."ProductDescription"."ModifiedDate"
FROM "SalesLT"."ProductDescription"
Use the Pandas read_sql_query() function to read the database
Use the SQLAlchemy select() function to create SQL SELECT statements that select rows from tables in the database. Then, use the Pandas read_sql_query() method to send the query to the database engine and return the result in a dataframe 4.
For example, use the Pandas read_sql_query() function to read selected data from the database and return it, already loaded into a Pandas dataframe. Assign the returned dataframe to a variable named desctriptions. See the example code, below:
import pandas as pd

descriptions = pd.read_sql_query(sql=statement, con=engine)
Show the dataframe shape and print the first five rows.
print(descriptions.shape)
print(descriptions.head())
The output below shows all 762 rows and all four columns from the ProductDescription database table are in the descriptions dataframe.
(762, 4)
   ProductDescriptionID                                        Description  \
0                     3                                    Chromoly steel.
1                     4       Aluminum alloy cups; large diameter spindle.
2                     5             Aluminum alloy cups and a hollow axle.
3                     8  Suitable for any type of riding, on or off-roa...
4                    64  This bike delivers a high-level of performance...

                                rowguid ModifiedDate
0  301EED3A-1A82-4855-99CB-2AFE8290D641   2007-06-01
1  DFEBA528-DA11-4650-9D86-CAFDA7294EB0   2007-06-01
2  F7178DA7-1A7E-4997-8470-06737181305E   2007-06-01
3  8E6746E5-AD97-46E2-BD24-FCEA075C3B52   2007-06-01
4  7B1C4E90-85E2-4792-B47B-E0C424E2EC94   2007-06-01
Selecting columns
When you used reflection to map database information into ORM classes, you created a collection of Python objects that represent elements in the database. One of these object types is the Column type. You can specify columns by name using dot notation, starting with the table name followed by the column name.
When building a query, you can select specific columns from a table by specifying each column as a parameter in the select() function. For example, to select only the ProductDescriptionID and Description columns in the ProductDescription table, run the following code:
statement = (select(ProductDescription.ProductDescriptionID,
                    ProductDescription.Description))
descriptions = (pd.read_sql_query(sql=statement, con=engine))
print(descriptions.shape)
print(descriptions.head())
You can see that only the columns you selected were loaded into the dataframe: it is still 762 rows but now only 2 columns:
(762, 2)
   ProductDescriptionID                                        Description
0                     3                                    Chromoly steel.
1                     4       Aluminum alloy cups; large diameter spindle.
2                     5             Aluminum alloy cups and a hollow axle.
3                     8  Suitable for any type of riding, on or off-roa...
4                    64  This bike delivers a high-level of performance...
Limiting output with the limit() method
In cases where you want to limit database output to a specific number of rows, use the limit() method. For example, to load only the first three rows into the dataframe, run the following code:
statement = (select(ProductDescription.ProductDescriptionID,
                    ProductDescription.Description)).limit(3)

descriptions = (pd.read_sql_query(sql=statement, con=engine))
print(descriptions.shape)
print(descriptions)
The output shows only three rows in the dataframe:
(3, 2)
   ProductDescriptionID                                   Description
0                     3                               Chromoly steel.
1                     4  Aluminum alloy cups; large diameter spindle.
2                     5        Aluminum alloy cups and a hollow axle.
Filtering with the where() method
The SQLAlchemy Select class's where() method acts like a filter, or search tool. It tells the SQL database to return only rows that match the filter criteria. For example, if you want to get only rows where the contents of the Description is the string "Chromoly steel", add the where() method to the instance returned by the select() function, as seen in the code below.
statement2 = (select(ProductDescription.ProductDescriptionID,
                    ProductDescription.Description)
             .where(ProductDescription.Description == 'Chromoly steel.'))
print(statement2)
The generate SQL statement is:
SELECT "SalesLT"."ProductDescription"."ProductDescriptionID", "SalesLT"."ProductDescription"."Description"
FROM "SalesLT"."ProductDescription"
WHERE "SalesLT"."ProductDescription"."Description" = :Description_1
The Select instance that returned the above SQL statement knows that the ":Description_1" variable's value is "Chromoly steel.". If you want, you can verify this wit the following Python code:
statement2.compile().params
The output shows a Python dictionary containing all the parameters that will be used in the SQLalchemy query:
{'Description_1': 'Chromoly steel.'}
When you pass the statement2 variable into the Pandas read_sql_query function, it creates the correct query for the SQL dialect used by the database. For example, the code below should filter query results:
descriptions2 = pd.read_sql_query(sql=statement, con=engine)

print(descriptions2.shape)
print(descriptions2.head())
This returned only one row: the row containing the description "Chromoly steel."
(1, 2)
   ProductDescriptionID      Description
0                     3  Chromoly steel.
You can filter results using different criteria such as searching for values larger than a specified number or results that do not equal a specified string or value. You can add AND and OR operators and build complex filter statements. See the SQLAlchemy Using SELECT statements tutorial for more details.
Use columns' like() method to search for text
Combine the SQLAlchemy Select instance's where() method with one or more columns' like() method to select rows where the text in a column meets a specific criteria. For example, if you want to select all rows where the Description column contains the word "Aluminum" anywhere in the string, run the following code:
statement3 = (select(ProductDescription.ProductDescriptionID,
                    ProductDescription.Description)
             .where(ProductDescription.Description.like("%Aluminum%")))

print(statement3)
The percent sign is an SQL literal that acts like a wildcard value. The print statement outputs the following SQL query:
SELECT "SalesLT"."ProductDescription"."ProductDescriptionID", "SalesLT"."ProductDescription"."Description"
FROM "SalesLT"."ProductDescription"
WHERE "SalesLT"."ProductDescription"."Description" LIKE :Description_1
Pass the SQLAlchemy Select instance to the Pandas read_sql_query() function, as shown below:
descriptions3 = (pd.read_sql_query(sql=statement3, con=engine))

print(descriptions3.shape)
print(descriptions3.head())
This will select only twenty-seven of the rows in the ProductDescriptions table. Each row loaded into the Pandas dataframe has the word "aluminum" in the Description column, as seen below.
(27, 4)
   ProductDescriptionID                                        Description
0                     4       Aluminum alloy cups; large diameter spindle.
1                     5             Aluminum alloy cups and a hollow axle.
2                   457  This bike is ridden by race winners. Developed...
3                   594  Travel in style and comfort. Designed for maxi...
4                   634  Composite road fork with an aluminum steerer t...
If you have very large data sets, you can imagine how useful it can be to filter data before it is loaded into a pandas dataframe.
Chaining select() methods
You can use other methods to perform more complex queries and you can chain the Select instance's methods together, like the way you can chain methods in Pandas.
For example, if you want to sort the returned results by the ProductDescriptionID column, and then select a specific range of rows, chain the order_by(), offset() and limit() methods together 5. To skip over the first three rows and then load the next two rows into the dataframe 6, run the following code:
statement = (
    select(ProductDescription.ProductDescriptionID,
           ProductDescription.Description)
    .order_by(ProductDescription.ProductDescriptionID)
    .offset(3)
    .limit(2)
)

descriptions = (pd.read_sql_query(sql=statement, con=engine))
print(descriptions.shape)
print(descriptions)
The output shows only two rows were loaded into the dataframe and it contains the fourth and fifth rows of the table after the table was sorted by the ProductDescriptionID:
(2, 2)
   ProductDescriptionID                                        Description
0                     8  Suitable for any type of riding, on or off-roa...
1                    64  This bike delivers a high-level of performance...
Joining tables using join() methods
You can select data from multiple columns in different tables where there is a relationship between tables. For example, the Product table contains a column that defines the product category ID, which is an integer, of each product in the table. The ProductCategory table lists the category name that corresponds to each Product Category ID. Similarly, the Product table lists the product model ID for each product and the ProductModel table lists the product model name that corresponds to each product model ID.
If you want the SQL database to return a table containing product information along with the product category name and the product model name, you need to join the Product, ProductCategory, and ProductModel tables and select the columns you need from each.
The following select() function will join the tables and select the columns you want:
statement = (
    select(Product.Name,
           Product.ProductNumber,
           ProductCategory.Name,
           ProductModel.Name)
    .join(ProductCategory)
    .join(ProductModel)
)

df = (pd.read_sql_query(sql=statement, con=engine))
print(df.shape)
print(df.head())
The output is shown below:
(295, 4)
                        Name ProductNumber       Name_1               Name_2
0  HL Road Frame - Black, 58    FR-R92B-58  Road Frames        HL Road Frame
1    HL Road Frame - Red, 58    FR-R92R-58  Road Frames        HL Road Frame
2      Sport-100 Helmet, Red     HL-U509-R      Helmets            Sport-100
3    Sport-100 Helmet, Black       HL-U509      Helmets            Sport-100
4     Mountain Bike Socks, M     SO-B909-M        Socks  Mountain Bike Socks
The SQLAlchemy Select class provides other join methods. The default join() method performs an inner join, which selects only rows where there is a corresponding match. Other types of join methods, like join_from() and outerjoin(), are available to support cases where you want to also select rows that do not match on one side of the join or the other.
Unlike when merging Pandas dataframes, we did not need to specify which columns to join on. SQLAlchemy knows the relationships between the tables because they are defined in the database schema and are now reflected in the SQLAlchemy ORM. In a well-designed database like the AdventureWorks LT database, the relationships between tables are already defined by primary and foreign keys, and association tables. SQLAlchemy objects can use these relationships to automatically join data in different tables together even if the columns that form the relationship have different names.
Labeling output columns
When joining tables that may have columns with the same name in each table, SQLAlchemy adds a suffix to each duplicate column name.
For example, the Product, ProductCategory, and ProductModel tables each have a column labeled Name. As shown in the previous example, SQLAlchemy renames the last two Name columns as "Name_1" and "Name_2". This is not very descriptive so you may want to manually rename the columns returned from the database.
Use the Column class's label() method to change the output column name to a label of your choice. Redo the previous example with labels:
statement = (
    select(
        Product.Name.label("ProductName"),
        Product.ProductNumber,
        ProductCategory.Name.label("CategoryName"),
        ProductModel.Name.label("ModelName")
    )
    .join(ProductCategory)
    .join(ProductModel)
)

df = (pd.read_sql_query(sql=statement, con=engine))
print(df.shape)
print(df.head())
The dataframe now has meaningful header names, as seen below:
(295, 4)
                 ProductName ProductNumber CategoryName            ModelName
0  HL Road Frame - Black, 58    FR-R92B-58  Road Frames        HL Road Frame
1    HL Road Frame - Red, 58    FR-R92R-58  Road Frames        HL Road Frame
2      Sport-100 Helmet, Red     HL-U509-R      Helmets            Sport-100
3    Sport-100 Helmet, Black       HL-U509      Helmets            Sport-100
4     Mountain Bike Socks, M     SO-B909-M        Socks  Mountain Bike Socks
Grouping results using the group_by() method
As a final example that hints at the powerful transformations you may perform on the SQL server before loading the results into a dataframe, create a SQL query that counts the number of products in each category and sorts the results in descending order.
from sqlalchemy import func, desc

statement = (
    select(
        ProductCategory.Name.label("CategoryName"),
        func.count(Product.ProductID).label("ProductCount")
    )
    .join_from(ProductCategory, Product, isouter=True)
    .group_by(ProductCategory.Name)
    .order_by(desc("ProductCount"))
)
df = (pd.read_sql_query(sql=statement, con=engine))
print(df.shape)
print(df)
There is a lot going on in this Select instance. You used the func() method to add SQL functions to the query and you used the join_from() method to specify which table is on the left and right side of the join. You also performed an outer join so you get all categories from the ProductCategory table grouped in the dataframe, even the ones that do not have products associated with them.
(41, 2)
         CategoryName  ProductCount
0          Road Bikes            43
1         Road Frames            33
2      Mountain Bikes            32
3     Mountain Frames            28
4       Touring Bikes            22
...
35         Bike Racks             1
36        Bike Stands             1
37              Bikes             0
38         Components             0
39           Clothing             0
40        Accessories             0
Unless you want to dedicate some time to mastering SQL and the SQLAlchemy Select class, it is probably best to perform procedures like grouping in a Python framework, such as Pandas.
Conclusion
This document showed you the simple ways you can use SQLAlchemy to build SQL queries, and how Pandas can use those queries to load database information into a Pandas dataframe. You only need to know a little bit about SQLAlchemy to use it.
Eventually, you should learn to use SQLAlchemy functions to Declaratively Map your database schema. Database reflection, which I used in this post, takes a long time and you should only use it when doing single-use scripts where performance is not an issue.
SQL and SQLAlchemy are powerful tools that can perform a lot of data transformations before you load the results into Pandas. However, in my opinion, it is clearer to use SQLAlchemy to perform simple data work like joining tables and filtering rows, and then use Pandas to perform complex data transformations and analysis.
-
From https://auth0.com/blog/sqlalchemy-orm-tutorial-for-python-developers/ on March 23, 2023 ↩
-
Diagram from Microsoft Learning Transact-SQL Exercises and Demonstrations website at https://microsoftlearning.github.io/dp-080-Transact-SQL/ ↩
-
It's important to know that there are two places to find table information because association tables that support many-to-many relationships between other tables do not get mapped to classes and are only available as table objects in the ORM. There are no association tables in the AdventureWorks LT database so we won't explore this complication at this time. ↩
-
You do not need to use Pandas. You may also use SQLAlchemy functions to send queries to the database and return results as Python objects. ↩
-
The offset() method requires the order_by() method or an error will occur. See: https://docs.sqlalchemy.org/en/20/dialects/mssql.html#limit-offset-support ↩
-
You may also use the limit() method instead of combining the offset() and limit() methods. ↩