Use Docker to Test and Deploy Python Web Apps
Posted on Tue 29 August 2023 in Docker
Docker offers a way to build applications that run on any system by bundling application dependencies with the application code. Docker containers, along with modern tools and software development processes like CI/CD and DevOps, enable developers to build automated software development pipelines that test their code and then deploy it quickly to production.
This post shows you how to use Docker to containerize an existing Python application, test the application locally, and then use Docker to deploy it to a remote server. I will focus on the manual steps, required at each stage so that I can better demonstrate how it works.
Identify an existing web app
First, identify an existing application you wish to containerize. In this post, I will use the first version of my usermapper-web application from Github. It's tagged as version 0.1. Run the following commands to get the application files.
$ wget https://github.com/blinklet/usermapper-web/archive/refs/tags/v0.1.tar.gz
$ tar -xvf v0.1.tar.gz
The application files will be uncompressed into a folder named usermapper-web-0.1.
$ cd usermapper-web-0.1
$ ls -1
application.py
LICENSE
README.md
requirements.txt
templates
Test the existing web app
Run and test the program so you know it works in its original form. Set up a Python virtual environment and install the Python packages upon which the application depends. Then, set up the necessary environment variables. Because the program stores data in the filesystem, create the necessary directory specified by the application.
Create a Python virtual environment
Create a Python virtual environment in the same folder and activate it:
$ python3 -m venv env
$ source env/bin/activate
(env) $
Install the application's dependencies:
(env) $ pip install -r requirements.txt
Create a dotenv file
The Flask frameworks needs some information from its environment so it knows which file to run. You can set environment variables on a server manually or you can store them in a file and access them using the Python dotenv package. When you downloaded version 0.1 of the usermapper-web project, you did not get the file named .env because I did not need it for that version of the application. In version 0.1, I set environment variables manually in the shell and on the web app.
But for a Docker container that can be deployed anywhere, it is convenient to have the environment variables stored as a file in the container,alongside the application that needs them. Create the dotenv file, named .env, using your favorite text editor:
$ nano .env
Add the following environment variables to the file. In a development environment, you don't need a properly-created secret key so just add some dummy text.
FLASK_APP=application
FLASK_ENV=development
SECRET_KEY=temporarykey
Save the dotenv file in the same directory as the application.py file.
Create the downloads directory
Next, create an empty directory named downloads. When it is running, the application will cache files in this folder.
$ mkdir downloads
Test the application
If you are using my usermapper-web application, run it so you can see how it works. Run the application with the following command:
(env) $ flask run
A Flask app like this should be running on the host computer's localhost loopback address on TCP port 5000. To test the application, enter the application's URL in a browser window. Use the following URL:
http://localhost:5000
The browser window should show the web app's first page, as shown in the screenshot below
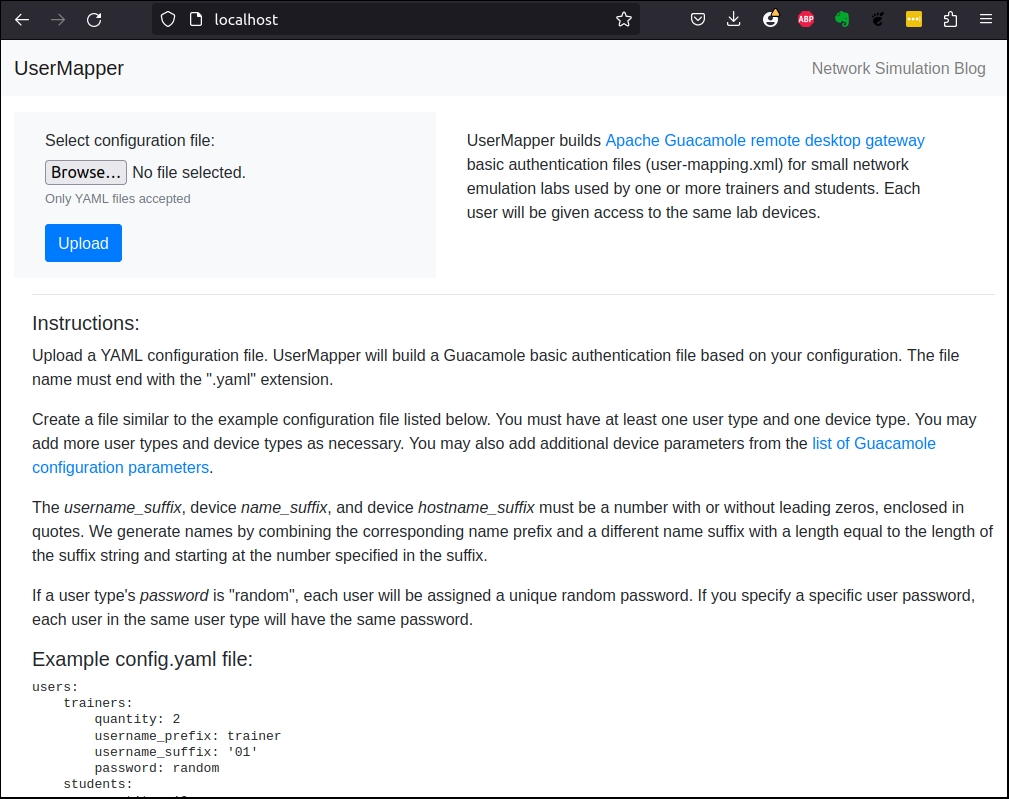
For more information about the web app and how to use it, either refer to the instructions on the web page or read my web app tutorial post that describes how I developed and use it.
After you finish testing the usermapper-web application, quit the Flask app by typing CTRL-C in the terminal window. Then, deactivate the virtual environment:
(env) $ deactivate
Containerize the application
In my webapp tutorial post, I described how to deploy the application to a Microsoft Azure web app service by creating an automated process that copies the application files from my GitHub repository to an Azure web app when a code change is committed. That remains a great way to deploy web apps, if you want to use Microsoft Azure's proprietary tools.
In this post, I will show you a more general-purpose way to deploy a web app that will run anywhere, including on a virtual private server (VPS) on any cloud provider. This requires that you take more responsibility for the way to package your application and for running other services that help serve and secure your application.
While you may containerize the application "as is", we plan to deploy this system to a production environment so you should make some changes that make it safer to run on the Internet: add a production-ready WSGI server to the application's environment and set up new production environment variables.
Add the Gunicorn WSGI server
The current program uses the Flask development server to run the web app. You should not use the Flask development server on a real web deployment. Instead, install a production-ready WSGI server, like Gunicorn. I prefer Gunicorn because it is a Python package, is easy to install, and is lightweight.
To install Gunicorn in the container image, add it to requirements.txt file. The contents of the file should now be the same as shown below.
wheel
flask
Flask-WTF
python-dotenv
bootstrap-flask
gunicorn
git+https://github.com/blinklet/usermapper.git@v0.3
Modify the .env file
It's a good idea to create an example dotenv file so, when you revisit your project in the future, you can remember which environment variables you need. If you like, copy the existing .env file to a file named dotenv.example. Then modify the .env file as described below.
In a production environment, Flask uses a secret key to help secure functions like reading inputs from Flask forms. To create a random key that you can use as your secret key, run the following commands.
$ python3 -c 'import secrets; print(secrets.token_urlsafe(32))'
The command requested a random key that is 32 bytes long. It should display on your terminal like the one shown below.
D9Oci7p2l9bqM8_uChJKA09tqXFOK7Db-FxKr6rGoDk
Copy the secret key and add it to your .env file, replacing the dummy key that used to be there. Also change the FLASK_ENV variable to "production". The new file should look like the following:
FLASK_APP=application
FLASK_ENV=production
SECRET_KEY=D9Oci7p2l9bqM8_uChJKA09tqXFOK7Db-FxKr6rGoDk
Create the Dockerfile
To create a Docker image that contains the Python packages and the application files, write a Dockerfile that contains the commands needed to build the image. If you need more information, please see my previous post where I cover building a Docker image.
In the Dockerfile, choose a base image. I chose an official Python image based on the Alpine Linux distribution, which is a very lightweight image. Then, document the TCP port that the application expects to use. Create the app's working directory on the container. Copy the files from the current directory on your PC, which contains the Dockerfile and all the application files and directories, to the working directory on the container. Run Linux commands that install software needed by the application. Finally, set the command that the container will run when it starts up.
Create the Dockerfile using your favorite text editor. It's contents should look like those below:
FROM python:alpine
EXPOSE 8080
WORKDIR /app
COPY . .
RUN apk update && \
    apk add git && \
    pip install --no-cache-dir -r requirements.txt
ENTRYPOINT ["gunicorn", "--bind", "0.0.0.0:8080", "application:app"]
Save the file and name it Dockerfile, which is a default name for a Dockerfile.
Create the Docker Ignore file
Next, create a .dockerignore file that tells Docker which files in the current directory should not be copied to the Docker image when you build it. You want to avoid copying Git repositories, Python cache files, Python virtual environments, and unneeded project files.
Create a new file in your text editor, name it .dockerignore, and add the following contents to it:
# Git files
.git
.gitignore

# Unneeded project files
dotenv.example
README*

# Python files
__pycache__
*.pyc
*.pyo
*.pyd

# Python virtual environments
env
.venv

# Docker files
.dockerignore
Dockerfile
Note that the downloads sub-directory is needed for the application to work correctly so it is not included in the .dockerignore file. When Docker copies all files to the container, it also copies directories.
Build the application image
Build the new image by running the Docker build command and pointing it to the current directory (the final "dot" in the command). Tag the new image. I chose to tag my image with the name, usermap:v1.
$ docker build -t usermap:v1 .
After the build is completed, you should see it in your local images repository:
$ docker images
REPOSITORY                       TAG       IMAGE ID       CREATED          SIZE
usermap                          v1        e80b2504dcab   13 minutes ago   112MB
postgres                         latest    43677b39c446   7 days ago       412MB
mcr.microsoft.com/mssql/server   latest    683d523cd395   3 weeks ago      2.9GB
Notice how Docker labels what you might think is the image name as the "repository". The real image name is the combination of repository and tag. This will be important later when you want to create a private repository on Docker Hub.
Test the image
To test that the image was built correctly and that the application will run correctly, create a new container from it.
$ docker run \
    --detach \
    --publish 80:8080 \
    --name user1 \
    usermap
The Docker run command's publish parameter maps the HTTP traffic that Gunicorn serves on TCP port 8080 to the host computer's loopback address at the default HTTP TCP port 80. The image you previously created runs Gunicorn when it starts in the container. The new container should start serving the web app via the Gunicorn server.
To test this, connect your browser to http://localhost. You should see the web app in the browser window. Test the web app by copying the example configuration file from the app's instructions to a file named config.yaml and the uploading that file to the app. The app should return an XML file named user-mapping-xml, in the format used by the Guacamole server.
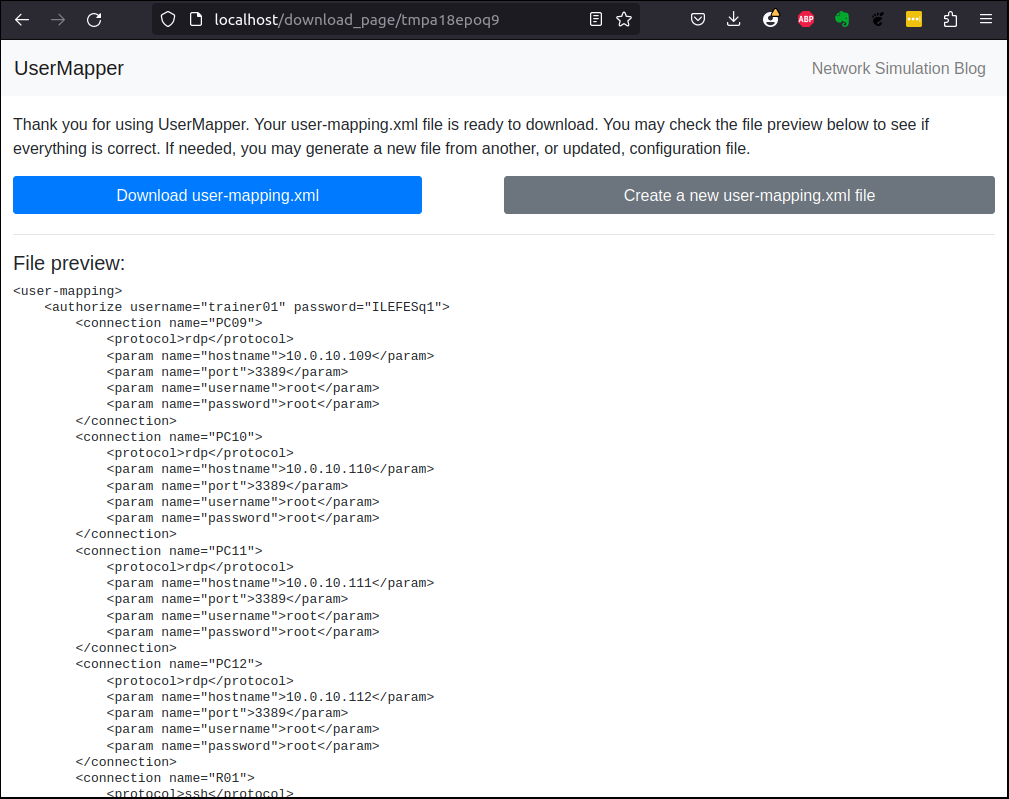
If you read the post that described my process of developing the app while I learned Flask, you will see that I used the filesystem to cache the generated XMP file. The temporary directories are in the container's downloads directory. You can check this by listing the contents of the downloads directory.
$ docker exec -it user1 ls -R ./downloads

./downloads:
tmp6qa2trde  tmpamu28g3y

./downloads/tmp6qa2trde:
user-mapping.xml

./downloads/tmpamu28g3y:
user-mapping.xml
Now that I am revisiting this project, I will use what I have learned over the past year and improve it by creating a more sustainable way to cache information shared between Flask views. I will try a couple of different cacheing ideas, including using a database. I will write about that in future posts.
Clean up the test container by stoppingit and then deleting it.
$ docker stop user1
$ docker rm user1
Publish the image
To deploy your image on a remote virtual private server, you will find it most convenient to publish your image to a repository from which you can pull it to the server. However, you need to be careful about exposing sensitive information on a public repository.
The dotenv file you copied to the Docker image contains a secret key that should not be made public. If you post your image in a public repository like Docker Hub, anyone who pulls the image can inspect it and find the secret key. There are multiple ways to manage secrets when deploying applications, that range from simple to complex. In this case, we will keep it simple and protect the secret key by pushing the Docker image to a private repository.
Create a private repository on Docker Hub
The Docker Hub allows one free private repository per user. You need to use the Docker Hub website to create a private repository on your Docker Hub account. Do the following:
- Log in to your account at hub.docker.com.
- Click the Create repository button
- Fill in the information about the repository and set it to private
- Click the Create button
The Docker Hub information should look similar to the screenshot below:
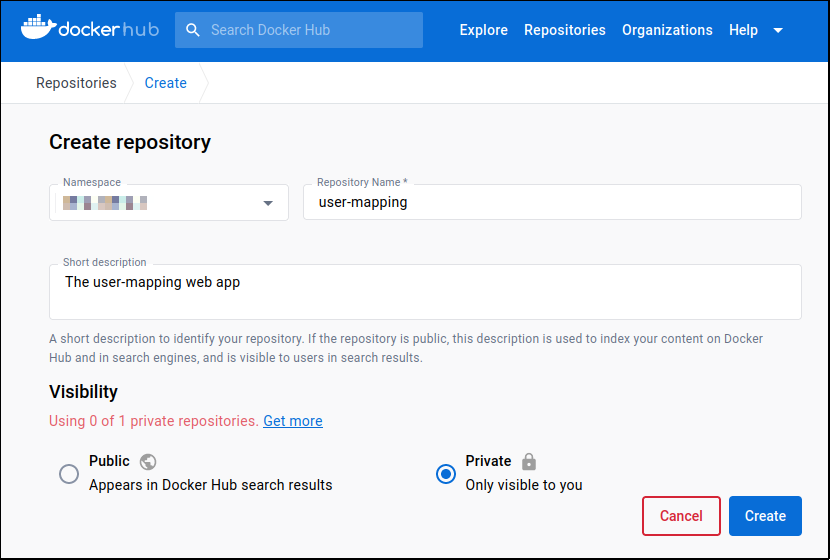
For the rest of this post, we will use the private user-mapping repository I created on my Docker Hub account.
Push your image to Docker Hub
Now that you have a private repository on Docker Hub, rename your image so it aligns with the new repository and give it a meaningful tag, like v1 for version one. Then, push your image to it using the Docker push command, as shown below:
$ docker tag usermap blinklet/user-mapping:v1
Now, when you list local images, you see the usermap:latest image is also called user-mapping:v1. See teh image ID to verify it is the same image under two different names:
$ docker images
REPOSITORY                       TAG       IMAGE ID       CREATED       SIZE
blinklet/user-mapping            v1        9ce0b76c0af7   3 days ago    113MB
usermap                          v1        9ce0b76c0af7   3 days ago    113MB
postgres                         latest    43677b39c446   12 days ago   412MB
mcr.microsoft.com/mssql/server   latest    683d523cd395   4 weeks ago   2.9GB
Push the image to your new private repository:
$ docker push blinklet/user-mapping:v1
Start a virtual private server
You will manually deploy a container on a virtual private server running in the cloud. Choose your provider based on your own requirements. Every service offers a web interface and most offer a command-line interface. The process for creating a VPS will be different on each service but the general steps should be similar. They are:
- Create the VPS. Choose the VPS specifications like CPU, memory, and storage sizes; location; and operating system
- Configure networking for the VPS. Select which IP's are allowed to connect or open it to the entire world. Choose the TCP port that will accept traffic. In this case, choose Port 80 for HTTP, which is good enough for this demonstration, assuming you will stop the web app after you verify it is deployed.
- Running a web app like usermapper-web on HTTP in the year 2023 is asking for trouble. In a future post, will cover how to secure your app using SSL encryption and HTTPS.
Choose a provider
Many cloud-based virtual private servers are available. Some examples for popular VPS providers are: Linode, Digital Ocean, Microsoft Azure, Amazon AWS, and Google Cloud. Most services offer free trials and also offer small servers for around five dollars a month. In this case, I will use Microsoft Azure because I already started a free trial with them, which includes one small VPS for 12 months.
Create the VPS
Create the virtual private server (VPS), which is usually a virtual machine running on a cloud service provider's infrastructure. We are using Microsoft Azure so the commands below use the Azure CLI. Microsoft Azure lets you run a virtual machine with size B1s free for 12 months. The usual process for creating an Azure VPS using Azure CLI is as follows:
Create a resource group for the VPS and all its resources. I chose to name my reource group vm-group and use Azure's eastus location. You may choose amy name that you like and any one of Microsoft Azure's regions.
$ az group create \
    --name vm-group \
    --location eastus
Create a virtual machine. Use the Ubuntu Server image. Set the size to Standard_B1s, which is the size allowed in the free service tire.
$ az vm create \
    --resource-group vm-group \
    --name usermap-vm \
    --image Ubuntu2204 \
    --size Standard_B1s \
    --admin-username brian \
    --generate-ssh-keys \
    --public-ip-sku Standard
Make a note of the information provided in the command output. You need to know the VM's public IP address:
SSH key files '/home/brian/.ssh/id_rsa' and '/home/brian/.ssh/id_rsa.pub' have been generated under ~/.ssh to allow SSH access to the VM. If using machines without permanent storage, back up your keys to a safe location.

{
  "fqdns": "",
  "id": "/subscriptions/e0892a48-576e-4aa9-a2d3-b7490707ccfb/resourceGroups/vm-group/providers/Microsoft.Compute/virtualMachines/usermap-vm",
  "location": "eastus",
  "macAddress": "00-22-48-27-03-C3",
  "powerState": "VM running",
  "privateIpAddress": "10.0.0.4",
  "publicIpAddress": "40.71.28.95",
  "resourceGroup": "vm-group",
  "zones": ""
}
In this case, the virtual machine's public IP address is 40.71.28.95. In this example, we use only IPv4 addresses.
Set the allowed TCP port. In this case, I allow only connections that request TCP posrt 80. Criminals know the IP address blocks used by Azure virtual machines and constantly scan them for vulnerable machines so, unless you have properly secured your VM, which we have not in this case, do not run it indefinitely.
$ az vm open-port --port 80 --resource-group vm-group --name usermap-vm
Install the web app on the server
Next, login to the VM using SSH. By default, Azure set up the VM to accept SSH connections using the key pair it automatically configured when you created it.
$ ssh -i ~/.ssh/id_rsa brian@40.71.28.95
On the VM, install Docker
brian@usermap-vm:~$ snap install docker
Then, login to Docker Hub and pull the application image from your private repository:
brian@usermap-vm:~$ sudo docker login
brian@usermap-vm:~$ sudo docker pull blinklet/user-mapping:v1
Run the docker container and map its application port 8080 to the VM's TCP port 80.
brian@usermap-vm:~$ sudo docker run \
  --detach \
  --publish 80:8080 \
  --name user1 \
  blinklet/user-mapping:v1
Exit the VM:
brian@usermap-vm:~$ exit
Test the application
Test the app. Open a browser to the virtual machine's IP address.
http://40.71.28.95
You should see that the web app is working on your remote server:
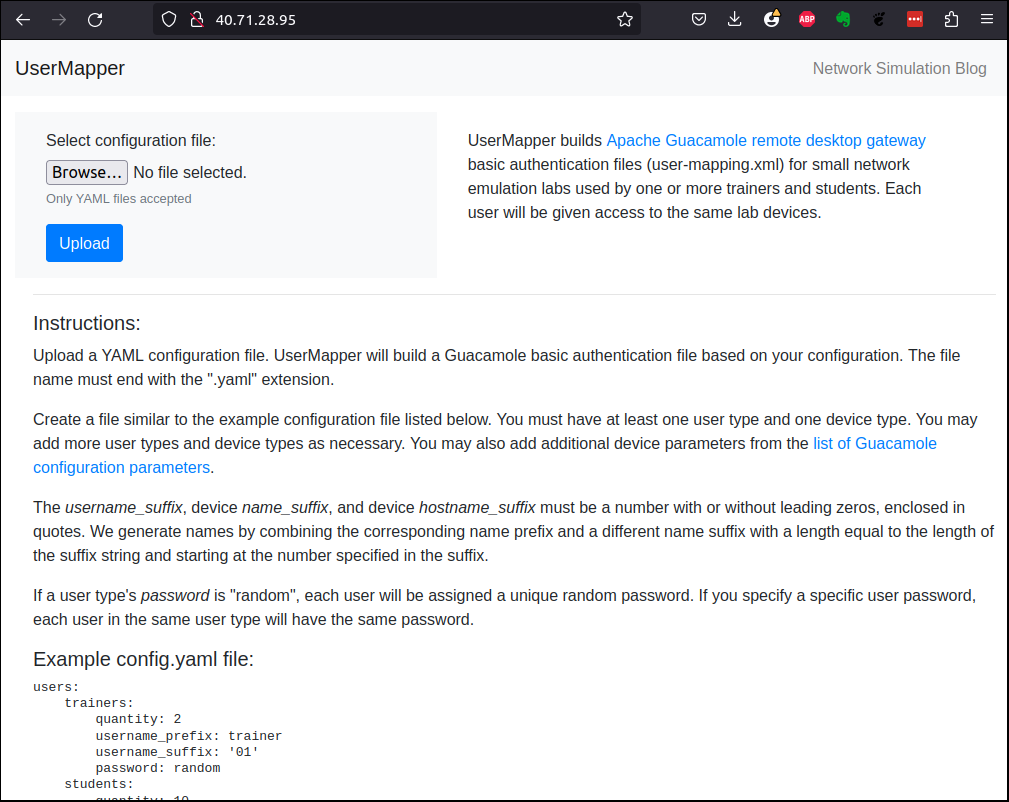
In this post, I don't cover how to set up your VPS to use a domain name like user-mapping.com. I'll cover that in a future post.
Clean up
It is easy to clean up your Azure virtual machine and its associated services. Just delete the entire resource group.
$ az group delete --resource-group vm-group
It may take more than a few minutes to delete all resources and the resource group.
Conclusion
You took an existing Python web app, and containerized it so it is easy to test locally and deploy anywhere.
Now that you have a containerized application, you can deploy it almost anywhere. Azure offers several other deployment options, depending on the level of responsibility you want to take and the amount you want to pay. Azure Web App for Containers, for example, will let you run a container on a platform that Microsoft has already secured. All other cloud service providers offer similar container-based web app services.
Once you start using containers for application deployment, you will want to start using more automation in your development process. You can use Docker Compose to automatically run multi-container applications. You can implement CI/CD processes and use WebHooks to automate the application update process.